

Connecting Github Actions to AWS using OpenID Connect(OIDC)

👋Hello, Hashnode community! I'm subbaramireddy, a passionate DevOps Engineer with a relentless commitment to optimizing software development workflows and infrastructure management. 🚀 Hands-on experience in the DevOps field, I've honed my skills in AWS cloud services, containerization, and CI/CD pipelines. As an AWS Certified Developer, I'm well-versed in leveraging cloud technologies to drive efficiency and innovation. 💡 I firmly believe in the power of continuous improvement. My journey began with an internship, where I immersed myself in the intricacies of DevOps, from deploying web applications to orchestrating containerized solutions. I've also delved into AWS CDK, enhancing security through RDS instance policies, and creating foundational infrastructure with precision. 🌐 My goal is to share insights, best practices, and the latest trends in the DevOps landscape. I'm excited to connect with like-minded professionals, engage in meaningful discussions, and learn from the diverse experiences of the Hashnode community. 📝 Let's explore the ever-evolving world of DevOps together. Feel free to connect with me, ask questions, or share your own insights. Together, we can drive innovation and efficiency in the tech world!
Open ID Connect (OIDC)
GitHub Actions workflows are often designed to access a cloud provider (such as AWS, Azure, GCP, or HashiCorp Vault) to deploy software or use the cloud’s services. To access cloud resources, it will supply credentials, such as a password or token, to the cloud provider. These credentials are usually stored as a secret in GitHub, and the workflow presents this secret to the cloud provider every time it runs.
However, using hardcoded secrets requires you to create credentials in the cloud provider and then duplicate them in GitHub as a secret.
With OpenID Connect (OIDC), you can take a different approach by configuring your workflow to request a short-lived access token directly from the cloud provider. Your cloud provider also needs to support OIDC on their end, and you must configure a trust relationship that controls which workflows can request access tokens. Providers that currently support OIDC include Amazon Web Services, Azure, Google Cloud Platform, and HashiCorp Vault, among others.
Benefits of using OIDC
By updating your workflows to use OIDC tokens, you can adopt the following good security practices:
No cloud secrets: You won’t need to duplicate your cloud credentials as long-lived GitHub secrets. Instead, you can configure the OIDC trust on your cloud provider, and then update your workflows to request a short-lived access token from the cloud provider through OIDC.
Authentication and authorization management: You have more granular control over how workflows can use credentials, using your cloud provider’s authentication (authN) and authorization (authZ) tools to control access to cloud resources.
Rotating credentials: With OIDC, your cloud provider issues a short-lived access token that is only valid for a single job, and then automatically expires.
Getting started with OIDC

So, when you run a job with an action: configure-aws-credentials. GitHub Actions takes the role which is mentioned in role-to-assume and requests for a token from the AWS cloud. It requests an OIDC token from GitHub’s OIDC provider, which responds with an automatically generated JSON web token (JWT) that is unique for each workflow job where it is generated. When the job runs, the OIDC token is presented to the cloud provider. To validate the token, the cloud provider checks if the OIDC token’s subject and other claims are a match for the conditions that were preconfigured on the cloud role’s OIDC trust definition. If all validations are correct then AWS generates a temporary token and sends it to GitHub actions so that it can be used to deploy resources in AWS Cloud.
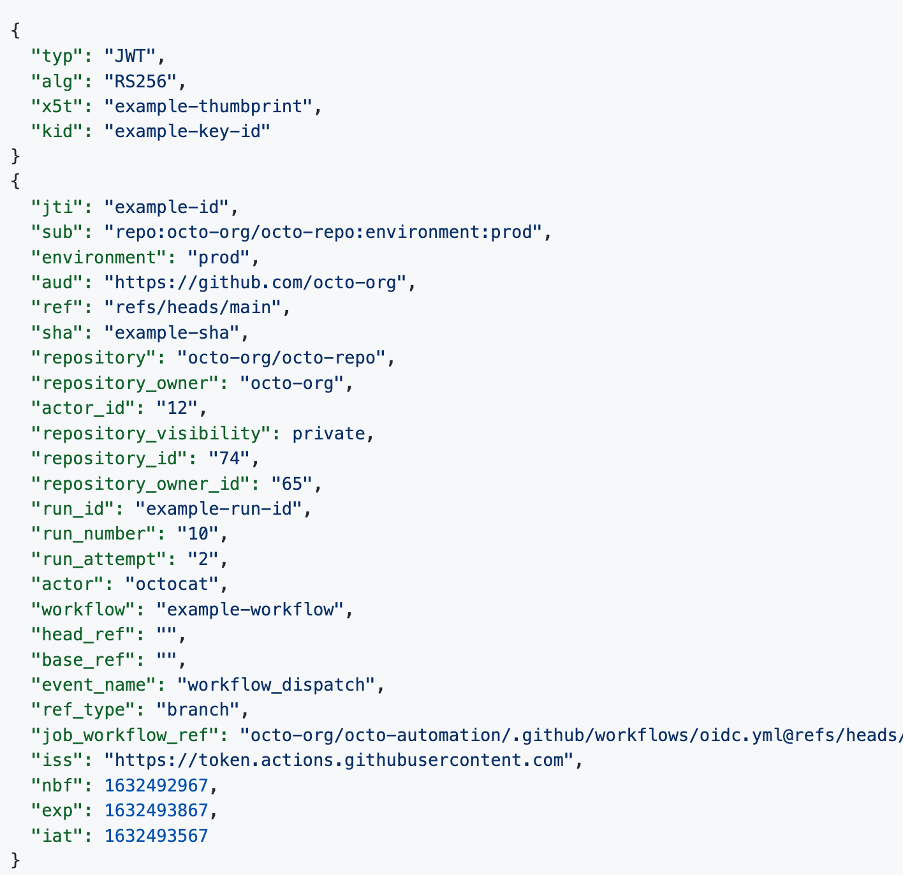
The JWT contains all parameters like repo name, branch name, and owner of the repository.
Create an OIDC provider in your account
Goto IAM -> Identity providers -> Add provide. For Provider type, choose OpenID Connect and Provider URL, and enter the URL of the GitHub OIDC IdP for this solution:
https://token.actions.githubusercontent.com
Choose Get thumbprint to verify the server certificate of your IdP. To learn more about OIDC thumbprints, see Obtaining the thumbprint for an OpenID Connect Identity Provider.

For Audience, enter sts.amazonaws.com. This will allow the AWS Security Token Service (AWS STS) API to be called by this IdP.
(Optional) For Add tags, you can add key–value pairs to help you identify and organize your IdPs. To learn more about tagging IAM OIDC IdPs, see Tagging OpenID Connect (OIDC) IdPs.
Verify the information that you entered. Your console should match the below screenshot. After verification, choose Add Provider.
Note: Each provider is in a one-to-one relationship to an external IdP. If you want to add more IdPs to your account, you can repeat this process.

Once you are taken back to the Identity Providers page, you will see your new IdP as shown below. Select your provider to view its properties, and make note of the Amazon Resource Name (ARN). You will use the ARN later in this post. The ARN will look similar to the following:
arn:aws:iam::111122223333:oidc-provider/token.actions.githubusercontent.com

To create an OIDC provider for GitHub (AWS CLI):
You can add GitHub as an IdP in your account with a single AWS CLI command. The following code will perform the previous steps outlined for the console, with the same results. For the value —thumbprint-list, you will use the GitHub OIDC
thumbprint 938fd4d98bab03faadb97b34396831e3780aea1.aws iam create-open-id-connect-provider ‐‐url "https://token.actions.githubusercontent.com" ‐‐thumbprint-list "6938fd4d98bab03faadb97b34396831e3780aea1" ‐‐client-id-list 'sts.amazonaws.com'To learn more about the GitHub thumbprint, see GitHub Actions – Update on OIDC based deployments to AWS. At the time of publication, this thumbprint is correct.
Both of the preceding methods will add an IdP in your account. You can view the provider on the Identity providers page in the IAM console.
Create an IAM role and scope the trust policy
You can create an IAM role with either the IAM console or the AWS CLI. If you choose to create the IAM role with the AWS CLI, you will scope the Trust Relationship Policy before you create the role.
The procedure to create the IAM role and to scope the trust policy come from the AWS Identity and Access Management User Guide. For detailed instructions on how to configure a role, see How to Configure a Role for GitHub OIDC Identity Provider.
To create the IAM role (IAM console):
In the IAM console, on the Identity providers screen, choose the Assign role button for the newly created IdP.

In the Assign role for box, choose Create a new role, and then choose Next, as shown in the following figure.

The Create role page presents you with a few options. Web identity is already selected as the trusted entity, and the Identity provider field is populated with your IdP. In the Audience list, select sts.amazonaws.com. In the GITHUB organization specify the github username and then choose Next.

On the Permissions page, select the
Administrator Accesspolicy and choose Next.
On the Create role page, add a role name. For this demo, enter
github-oidc-role. Optionally add a description. (Optional) add tags to this new role, and then choose Create role.
To create a role (AWS CLI)
In the AWS CLI, use the example trust policy shown below. This policy is designed to limit access to a defined GitHub organization, repository, and branch.
Create and save a JSON file with the example policy to your local computer with the file name trustpolicyforGitHubOIDC.json.
 {
     "Version": "2012-10-17",
     "Statement": [
         {
             "Effect": "Allow",
             "Principal": {
                 "Federated": "<arn:aws:iam::111122223333:oidc-provider/token.actions.githubusercontent.com>"
             },
             "Action": "sts:AssumeRoleWithWebIdentity",
             "Condition": {
                 "StringEquals": {
                     "token.actions.githubusercontent.com:sub": "repo: <aws-samples/EXAMPLEREPO>:ref:refs/heads/<ExampleBranch>",
                     "token.actions.githubusercontent.com:aud": "sts.amazonaws.com"
                 }
             }
         }
     ]
 }
Run the following command to create the role.
aws iam create-role --role-name GitHubAction-AssumeRoleWithAction --assume-role-policy-document file://C:\policies\trustpolicyforGitHubOIDC.jsonFor more details on how to create an OIDC role with the AWS CLI, see Creating a role for federated access (AWS CLI).
Create a GitHub action to invoke the AWS CLI
GitHub actions are defined as methods that you can use to automate, customize, and run your software development workflows in GitHub. The GitHub action that you create will authenticate into your account as the role that was created in Step 2: Create the IAM role and scope the trust policy.
To create a GitHub action to invoke the AWS CLI:
Open the github-actions repository and click on the code -> codespaces -> Create codespace on main.

It will create a codespace and open the Visual Studio code workspace with the repository files.

Create a basic workflow file, such as
github-oidc.yml, in the .github/workflows directory of your repository. This sample workflow will assume thegithub-oidc-role role, to perform the action awssts get-caller-identity. Your repository can have multiple workflows, each performing different sets of tasks. After GitHub is authenticated to the role with the workflow, you can use AWS CLI commands in your account.Paste the following example workflow into the file.
 # This is a basic workflow to help you get started with Actions
 name: Connect to an AWS role from a GitHub repository
 # Controls when the action will run. Invokes the workflow on push events but only for the main branch
 on:
   push:
     branches: [ main ]
   pull_request:
     branches: [ main ]
 env:
   AWS_REGION : <"us-east-1"> #Change to reflect your Region
 # Permission can be added at job level or workflow level
 permissions:
       id-token: write   # This is required for requesting the JWT
       contents: read    # This is required for actions/checkout
 jobs:
   AssumeRoleAndCallIdentity:
     runs-on: ubuntu-latest
     steps:
       - name: Git clone the repository
         uses: actions/checkout@v3
       - name: configure aws credentials
         uses: aws-actions/configure-aws-credentials@v1.7.0
         with:
           role-to-assume: <arn:aws:iam::111122223333:role/GitHubAction-AssumeRoleWithAction> #change to reflect your IAM role’s ARN
           role-session-name: GitHub_to_AWS_via_FederatedOIDC
           aws-region: ${{ env.AWS_REGION }}
       # Hello from AWS: WhoAmI
       - name: Sts GetCallerIdentity
         run: |
           aws sts get-caller-identity
Modify the workflow to reflect your AWS account information:
AWS_REGION: Enter the AWS Region for your AWS resources.
role-to-assume: Replace the ARN with the ARN of the AWS GitHubAction role that you created previously.
Push the added workflow to the repo as follows:

In the example workflow, if there is a push or pull on the repository’s “main” branch, the action that you just created will be invoked.

The figure shows the workflow steps in which GitHub does the following:
Authenticates to the IAM role with the OIDC IdP in the Region that was defined in the workflow file in the step configure AWS credentials.
Calls aws sts get-caller-identity in the step Hello from AWS. WhoAmI… Run AWS CLI sts GetCallerIdentity.

GitHub Actions Workflow to List the S3 buckets
In the codespace visual code workspace add the below step in the workflow file to list the s3 buckets in the region
 - name: List the S3 buckets
   run: aws s3 ls
2. Push the code to repo. It will automatically invoke the workflow file.

Audit the role usage: Query CloudTrail logs
The final step is to view the AWS CloudTrail logs in your account to audit the use of this role.
To view the event logs for the GitHub action:
In the AWS Management Console, open CloudTrail and choose Event History.
In the Lookup attributes list, choose Event source.
In the search bar, enter sts.amazonaws.com.

You should see the GetCallerIdentity and AssumeRoleWithWebIdentity events, as shown in Figure 6. The GetCallerIdentity event is the Hello from AWS. step in the GitHub workflow file. This event shows the workflow as it calls aws sts get-caller-identity. The AssumeRoleWithWebIdentity event shows GitHub authenticating and assuming your IAM role GitHubAction-AssumeRoleWithAction.
You can also view one event at a time.
To view the AWS CLI GetCallerIdentity event:
In the Lookup attributes list, choose User name.
In the search bar, enter the role-session-name, defined in the workflow file in your repository. This is not the IAM role name, because this role-session-name is defined in line 30 of the workflow example. In the workflow example for this blog post, the role-session-name is
GitHub_to_AWS_via_FederatedOIDC.You can now see the first event in the CloudTrail history de

To view the AssumeRoleWithWebIdentity event
In the Lookup attributes list, choose User name.
In the search bar, enter the GitHub organization, repository, and branch that is defined in the IAM role’s trust policy. In the example outlined earlier, the user name is repo:aws-samples/EXAMPLE:ref: refs/heads/main.
You can now see the individual event in the CloudTrail history.
Conclusion
When you use IAM roles with OIDC identity providers, you have a trusted way to provide access to your AWS resources. GitHub and other OIDC providers can generate temporary security credentials to update resources and infrastructure inside your accounts.
In this blog, you learned how to use federated access to assume a role inside AWS directly from a workflow action file in a GitHub repository. With this new IdP in place, you can begin to delete AWS access keys from your IAM users and use short-term credentials.
After you read this post, we recommend that you follow the AWS Well-Architected Security Pillar IAM directive to use programmatic access to AWS services using temporary and limited-privilege credentials. If you deploy IAM federated roles instead of AWS user access keys, you follow this guideline and issue tokens by the AWS Security Token Service. If you have feedback on this blog, leave a comment below and let us know how you would like to see OIDC workflows expanded to help your IAM needs.
Thanks for reading! I hope you found this helpful and informative.
I'm always happy to connect with fellow tech enthusiasts and answer any questions you may have. Don't forget to follow me for more updates on tech, programming, and more.😄😄
Follow me on LinkedIn to see interesting posts like this : ) Linkedin


