

TASK-3:Store the Timetable management system application logs from Ec2 instance to AWS cloud Watch.

👋Hello, Hashnode community! I'm subbaramireddy, a passionate DevOps Engineer with a relentless commitment to optimizing software development workflows and infrastructure management. 🚀 Hands-on experience in the DevOps field, I've honed my skills in AWS cloud services, containerization, and CI/CD pipelines. As an AWS Certified Developer, I'm well-versed in leveraging cloud technologies to drive efficiency and innovation. 💡 I firmly believe in the power of continuous improvement. My journey began with an internship, where I immersed myself in the intricacies of DevOps, from deploying web applications to orchestrating containerized solutions. I've also delved into AWS CDK, enhancing security through RDS instance policies, and creating foundational infrastructure with precision. 🌐 My goal is to share insights, best practices, and the latest trends in the DevOps landscape. I'm excited to connect with like-minded professionals, engage in meaningful discussions, and learn from the diverse experiences of the Hashnode community. 📝 Let's explore the ever-evolving world of DevOps together. Feel free to connect with me, ask questions, or share your own insights. Together, we can drive innovation and efficiency in the tech world!
AWS CloudWatch:
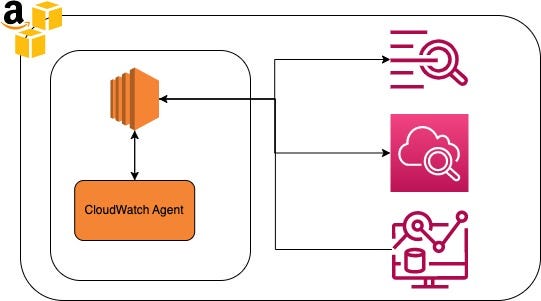
Amazon CloudWatch is a monitoring and observability service provided by Amazon Web Services (AWS). It enables you to collect, analyze, and visualize various metrics and logs from your AWS resources and applications in real-time. CloudWatch helps you gain insights into the performance and health of your infrastructure and applications, making it easier to maintain and troubleshoot your AWS environment.
AWS CloudWatch Agent
AWS CloudWatch Agent is a software component provided by Amazon Web Services (AWS) that enables you to collect and publish custom metrics, logs, and system-level performance data from your EC2 instances and on-premises servers to Amazon CloudWatch. It acts as an intermediary, gathering information about the resources it is installed on and sending that data to CloudWatch for monitoring, analysis, and visualization.
Steps:
Before CloudWatch can function with an EC2 instance, it requires an IAM role. When appropriately configured with the principle of least privilege, this IAM role enables CloudWatch to operate effectively without unnecessary permissions.
IAM Role Creation
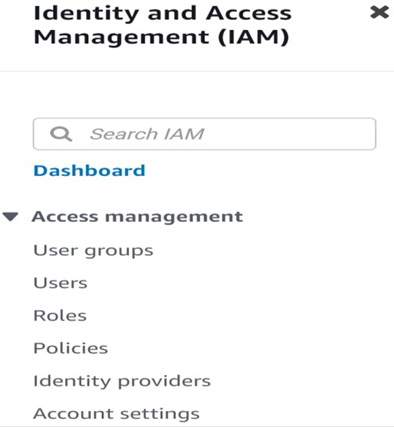
Open the AWS management console and search for Identity Access Management (IAM). Select the IAM under Security, Identity and Compliance.
AWS management console → IAM

Now, on the left-hand side of the screen, click on "Roles" under the "Access Management" category in the menu.
On the Roles screen, please choose "Create Role," which can be found at the top of your screen.

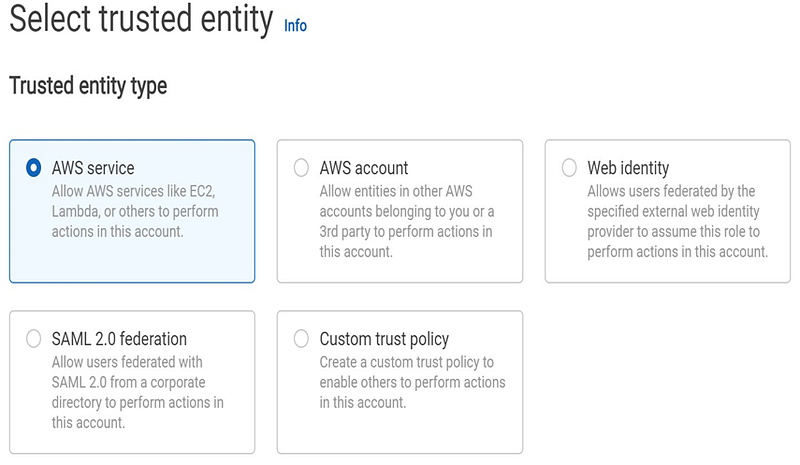
While on the "Create Role" page, specify the "Type of Trusted Entity" as "AWS Service." AWS Service roles enable AWS services to interact with other resources, such as CloudWatch, on your behalf.
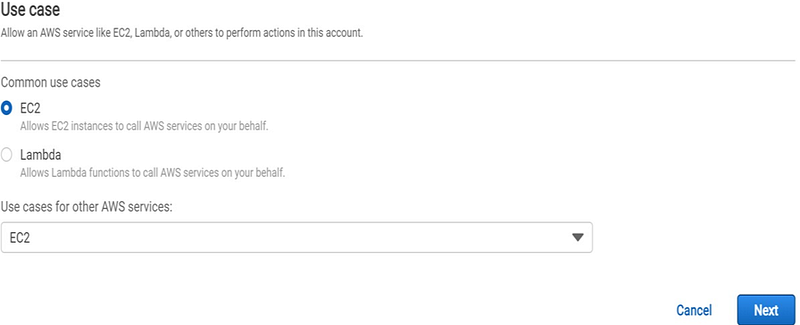
From the list of use cases, please choose the "EC2" option, as the CloudWatch Agent will be installed on an EC2 instance and will need to communicate with CloudWatch.
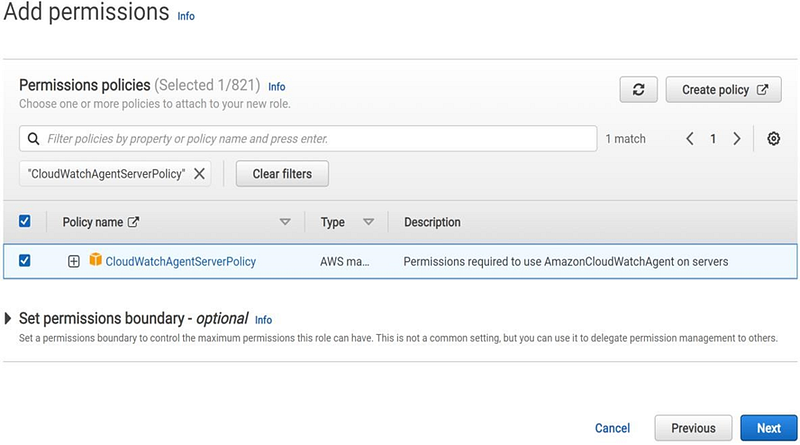
On the permissions page, locate the "CloudWatchAgentServerPolicy" by entering it into the search bar. Then, check the box to the left of the "CloudWatchAgentServerPolicy's Policy Name." After selecting it, proceed to the next step by clicking on "Next: Tags."
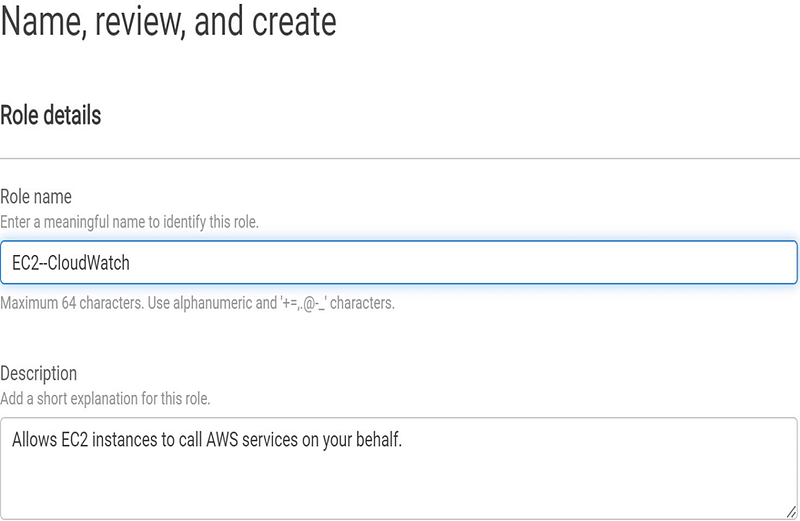
Assign a unique name to your role, and then click on "Create Role." In the example screenshot provided, the role is named "EC2CloudWatchAgentRole".
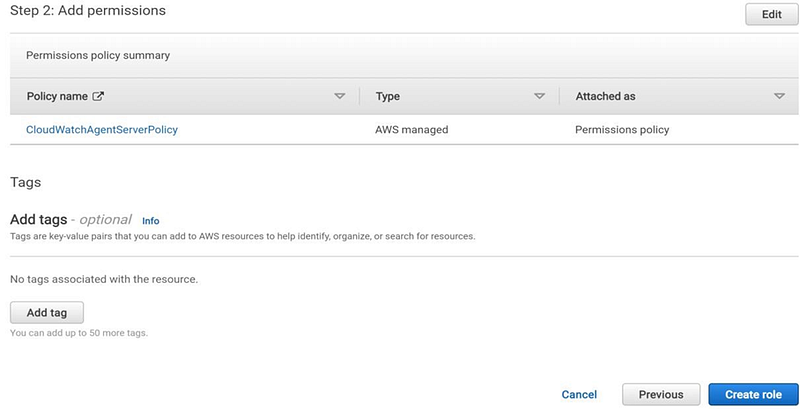
You will be presented with a list of permissions attached to the EC2 role. Once you've reviewed the permissions and are ready to proceed, click on the "Create Role" button.
Now, please check for a success message at the top of your screen. You should see a message that identifies the IAM role's name, similar to the example shown below.

Attach the IAM Role
Now you've successfully created an IAM role and attached the appropriate IAM policy, the next step is to associate this role with your EC2 instance. To do this, follow these: Open the EC2 Instance dashboard.
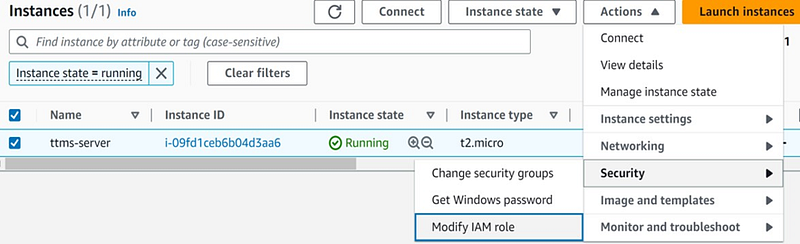
In the "Instances" window, select the checkbox located to the left of the EC2 Instance on which you plan to install the CloudWatch Agent.

Select Actions → Security → Modify IAM Role. The Modify IAM Role option brings you to a menu that allows you to select and attach the IAM role created.
Now, from the dropdown menu, choose the role you created earlier in this task (EC2CloudWatchAgentRole). After selecting the role, click on the "Save" button to attach it to your EC2 instance.
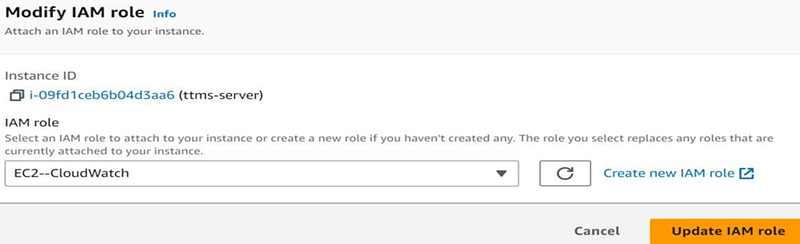
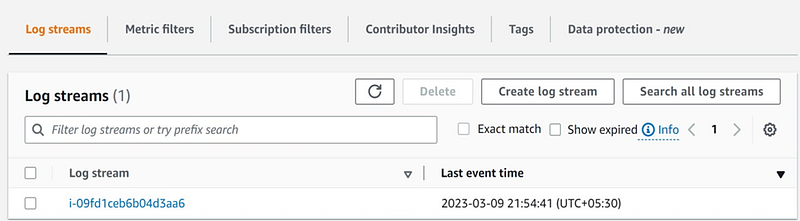
To confirm that the role has been successfully attached to your EC2 instance, please check for a success message at the top of your screen. This message typically contains the IAM role name and the EC2 instance's Instance ID. The example screenshot you mentioned displays the IAM Role name as "EC2CloudWatchAgentRole" and the Instance ID as "i-09fd1ceb6b04d3aa6.

CloudWatch Agent Installation
IAM role attached to your EC2 Instance, it can now communicate with the necessary CloudWatch services. Now it’s time to transfer the CloudWatch Agent from Amazon’s Simple Storage Service (S3) to your EC2 Instance. You can download the CloudWatch agent via a web browser, but we are using PowerShell. Connect the Ec2 instance using the Remote Desktop or session Manager.
Next, download the CloudWatch Agent installation package invoking PowerShell’s InvokeWebRequest cmdlet. This cmdlet will download the amazon-cloudwatch-agent.msi installation package to your desktop.
#Download the CloudWatch Agent installation package to the user's desktop.
 Invoke-WebRequest -Uri https://s3.amazonaws.com/amazoncloudwatch-agent/windows/amd64/latest/amazon-cloudwatch-agent.msi -OutFile $env:USERPROFILE\Desktop\amazon-cloudwatch-agent.msi

To verify the amazon-cloudwatch-agent.msi installation package exists using PowerShell’s Test-Path cmdlet. The returned value of True indicates that your download was successful!
#Verify Amazone CloudWatch Agent was successful.
 Test-Path -Path $env:USERPROFILE\Desktop\amazon-cloudwatch-agent.msi

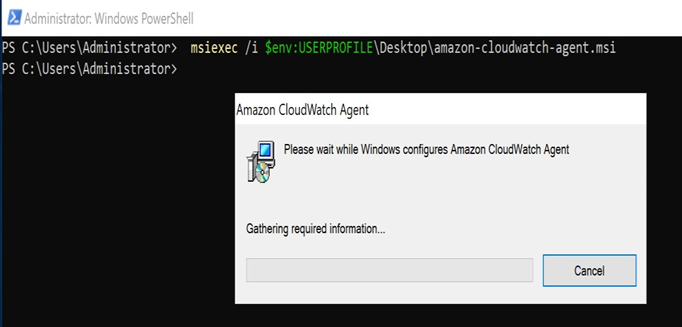
Next, run the CloudWatch Agent MSI installer using msiexec. msiexec is a Windows-native executable that installs MSI packages. The command below uses msiexec with the install (/i) switch to install amazon-cloudwatch-agent.msi from your desktop.
#Install the CloudWatch Agent
 msiexec /i $env:USERPROFILE\Desktop\amazon-cloudwatch-agent.msi
Once you execute the command, a window will appear that displays a progress bar. The installation process only takes a few seconds. Allow it to complete before moving to the next section
Now that the CloudWatch Agent is installed, you must tell the agent what to collect and where to send the collected data. This configuration is defined within the JSON-based CloudWatch Agent Configuration File. To build the configuration file, the CloudWatch agent comes with a configuration wizard to accomplish this task. Launch amazon-cloudwatch-agent-config-wizard.exe by running the following code snippet. The executable program is menu-driven and will provide configurable options within your PowerShell console session.
#Launch the amazon-cloudwatch-agent-config-wizard.exe executable
 & $env:ProgramFiles\Amazon\AmazonCloudWatchAgent\amazon-cloudwatch-agent-config-wizard.exe
Next, choose the options that you would like to apply to the configuration file. The chosen options in this task keep the metric collection settings in their default state and customize the Windows event log option to collect logs from the application with specific path c:\xampp\apache\logs\access.log. create a log group name as ttms-logs and log stream as Instance ID to identify the application logs easily.

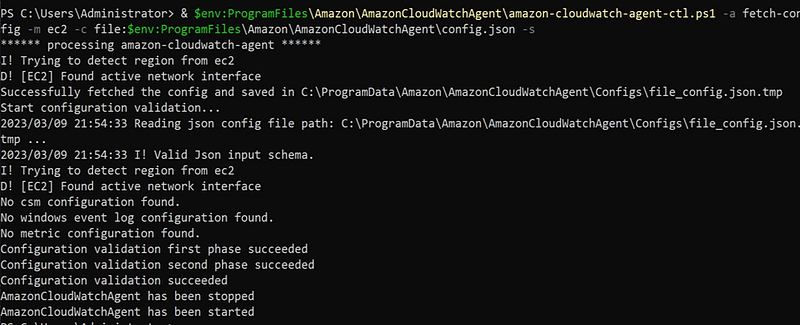
Now, apply the CloudWatch agent configuration using the included amazon-cloudwatch-agent-ctl.ps1 PowerShell script. The following code snippet applies the agent configuration by telling the CloudWatch Agent to fetch the config from $env:ProgramFiles\Amazon\AmazonCloudWatchAgent\config.json.
#Apply CloudWatch Agent Configuration
 & $env:ProgramFiles\Amazon\AmazonCloudWatchAgent\amazon-cloudwatch-agent-ctl.ps1 -a fetch-config -m ec2 -c file:$env:ProgramFiles\Amazon\AmazonCloudWatchAgent\config.json -s
The expected output of the command is shown below. In the following screenshot, you will see that the agent successfully fetched the config and validated the configuration. After the script validates the configuration, the script restarts the agent.
Great work! The CloudWatch agent is now installed and configured on your EC2 Instance! If you followed along, metrics and log data are now being sent to the CloudWatch service!
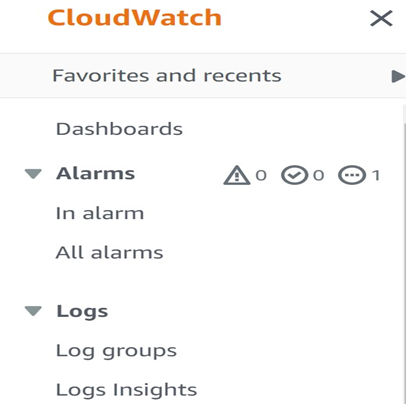
CloudWatch Logs
To view the application logs sent by the cloud watch agent. select the CloudWatch service from the AWS management console and click on the Log Groups.
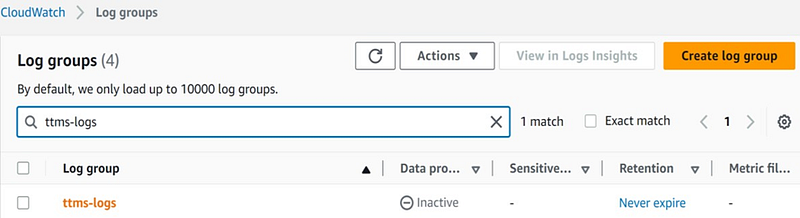
We can view the log group of our application that is ttms-logs and select that Log Group.
Logs are stored in the Log Streams based on the Instance ID as shown and click on Instance ID.
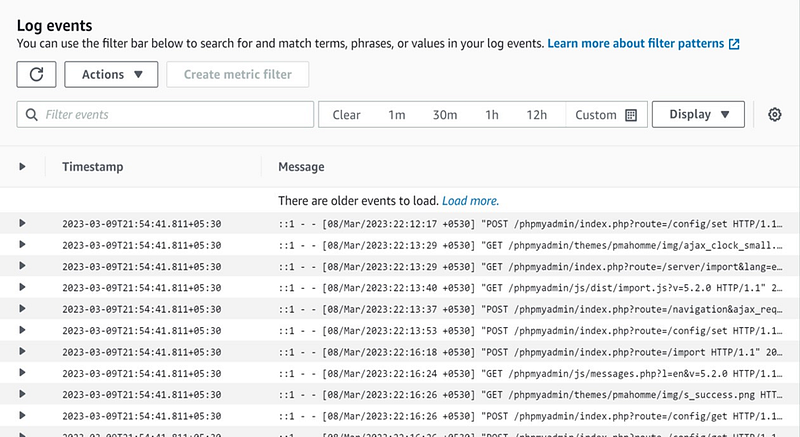
We can access the application logs, sent by our CloudWatch agent, in the Log Events section.
Thanks for reading! I hope you found this helpful and informative.
I'm always happy to connect with fellow tech enthusiasts and answer any questions you may have. Don't forget to follow me for more updates on tech, programming, and more.😄😄
Follow me on LinkedIn to see interesting posts like this : ) Linkedin


